If you want to start a blog on WordPress, you have definitely chosen the best blogging platform.
And what makes us say why is WordPress best for blogs?
- It is almost free to set up a WordPress blog
- It gives you the power to create any “type and style” of website
- It is stable and most SEO-friendly
And, of course, a successful blog shows your work to the world, and you can make money from blogging down the road.
Whether you are techy or not, you can create a blog on WordPress in less than 20 minutes.
And that too on your own.
Before we move on, let’s clear a confusion that haunts most newbies.
What are wordpress.com and wordpress.org?
If I have to create a blog on WordPress, should it be wordpress.com or wordpress.org?
What’s the difference? Which one is right?
Precisely, both are different but similar in a few aspects.
The “.com” variant is a controlled environment with limited resources at your disposal – space and features.
If you don’t want to spend a dime and wish to get a taste of creating a blog and even run it successfully, the first option, wordpress.com, is the place you can do early experiments.
It is more like creating an account on Facebook where you can publish textual and graphical posts within the limits Facebook has defined for everyone.
On the other hand, wordpress.org allows you to set up an entirely independent website of your own (a blog preferably) where controls are in your hands.
If you are new to blogging and not sure what the difference is between blog, blogger, and blogging, you can take a look at our guide on what is a blog?
For the sake of this tutorial, we have chosen the self-hosted WordPress option.
We are using Hostinger as the web host, but you can install WordPress and follow the steps on any web host of your choice.
Steps to start a blog on WordPress
- Select the blogging niche
- Signup with the best web host
- Buy a domain name
- Install WordPress on the site
- Publish your first WordPress blog post
Step# 1 Select the blogging niche
Selecting the best niche for blogging is critical for the success of your blog.
In simple words, a niche is the topic of your blog.
It has to be something you are passionate about producing content. Plus, it has to be a profitable industry or a segment of the industry.
For example, you are a fitness freak, and to help people, you can select Health and Fitness as a niche for the blog.
And similarly, someone who is into technology may want to review smartphones on the blog.
If you want a to-the-point guide on selecting a niche for blogging, Syed Balkhi writes it here.
But, at this point, I guess you have already chosen the topic for your blog.
Step# 2 Buy a domain name
A domain URL is a unique address, or we can call it a unique identifier of your blog/website that appears in the browser’s address bar.

Based on your niche, buy a domain from a reputed domain registrar, which usually costs just over $10 per year.
You can get hold of it for as many years as you want.
Note: In step 3, we will tell you how to do free domain name registration.
Buying a domain name is an easier task; you just need to reach out to one of the best domain registrars, such as domain.com, GoDaddy, Namecheap, etc. However, don’t forget to buy a domain that is related to your niche.
Step# 3 Signup with the best web hosting company
Your first experience shouldn’t be a nightmare. The search for the best WordPress hosting can turn out to be a strenuous process.
I would say the cheapest web hosting isn’t always the best one, but there are exceptions.
We have recommended the top WordPress hosting below for your ease. For beginners, they can be a real value for money.
We would recommend going with Hostinger WordPress hosting for being reliable, value for money, and speedy solution.
Bluehost is also a good choice because WordPress officially recommends them. However, we vote for Hostinger since we use them for many of our sites, and the experience is going well so far.
Note: A tip to save some money. Almost every popular web host offers a free web domain for the first year. So grab it.
Why do we recommend Hostinger? Because;
- You can get up to a 75% discount on the first signup on longer plans, on a 3-yearly purchase at least. See the table below for other options.
- You get a free domain for the first year that usually costs over $10 a year. It will reduce your first year’s cost.
- The installation process is straightforward.
- You get loads of resources.
- You can also get your choice of server location and the option to change location if earlier isn’t working out well.
How to sign up?
To get started, click on this link to register with Hostinger.
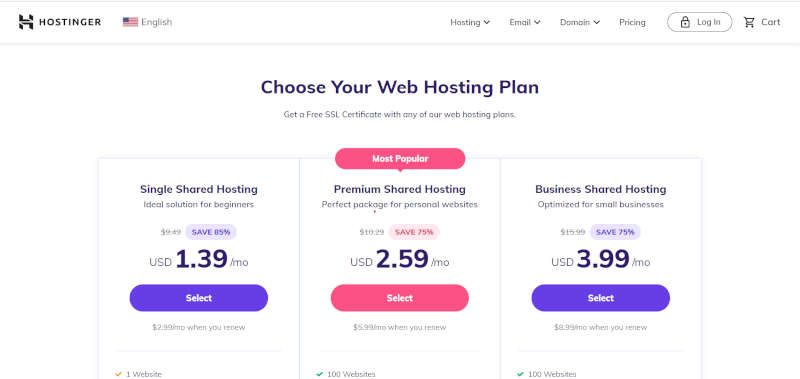
Out of three plans, we would recommend going with the “Premium Shared Hosting” since we find it ideal for the first-timers and great value for money. Why?
- It gives one year of free domain registration
- A free SSL certificate, necessary for the site’s security
- You will also get 24/7 support
- Weekly backups
- And a very user-friendly dashboard that explains everything.
On the next screen, choose the duration of the plan that suits you the most. The 12-months plan might cost you $5.99 per month, but you can opt for a 3-year plan to bring down monthly charges to $2.59.
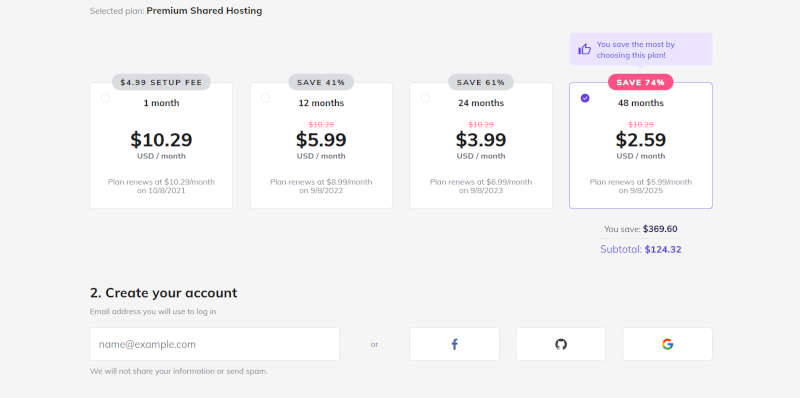
Next, create your credentials, and you are done.
You will get a couple of emails as a part of the confirmation of your purchase. A few of them will have guidelines to access the user dashboard.
Claim your free domain
Now it’s time to go inside the Hostinger’s user area. After logging in, Hostinger might ask you a few questions as part of their survey. You can either take the survey or skip it. Eventually, you will end up landing on the following screen.
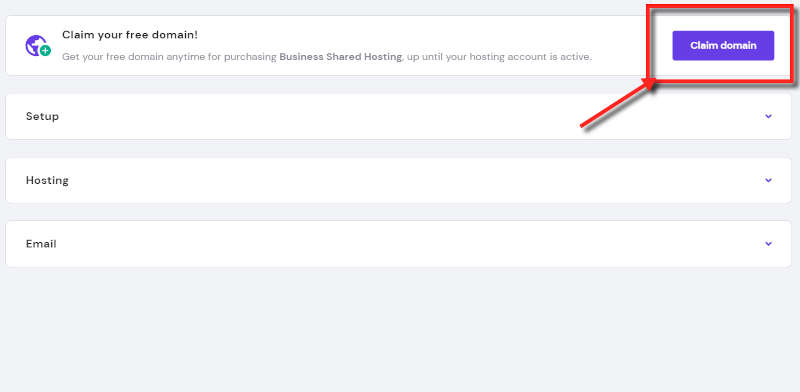
Click on the blue button to claim your free domain. The setup will process it in two steps;
- Claim the domain name first, and
- Hostinger will register the requested domain in your name that will require an email confirmation. It might take a few minutes.
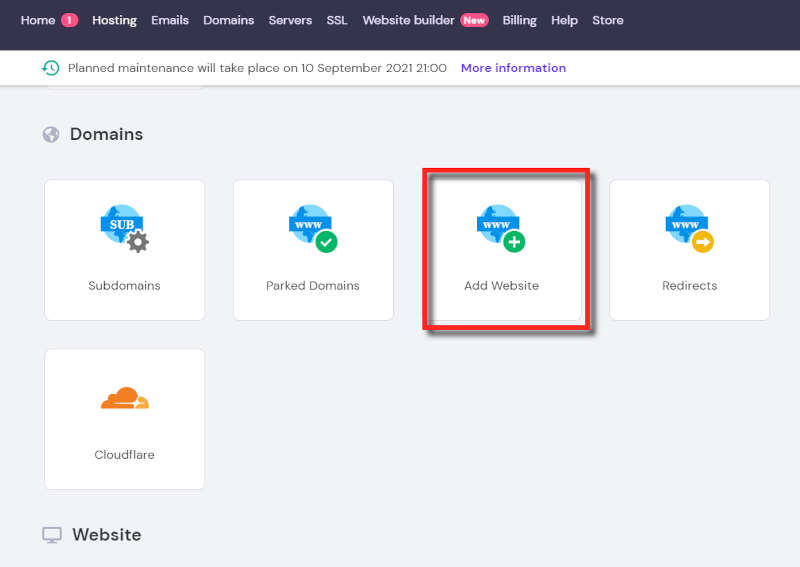
Add domain to hosting account
Come back to the user area for adding the recently registered domain to the hosting account. You should do it by clicking the “Add website” icon, as shown in the following screenshot. Hostinger will set up the name servers setting automatically.
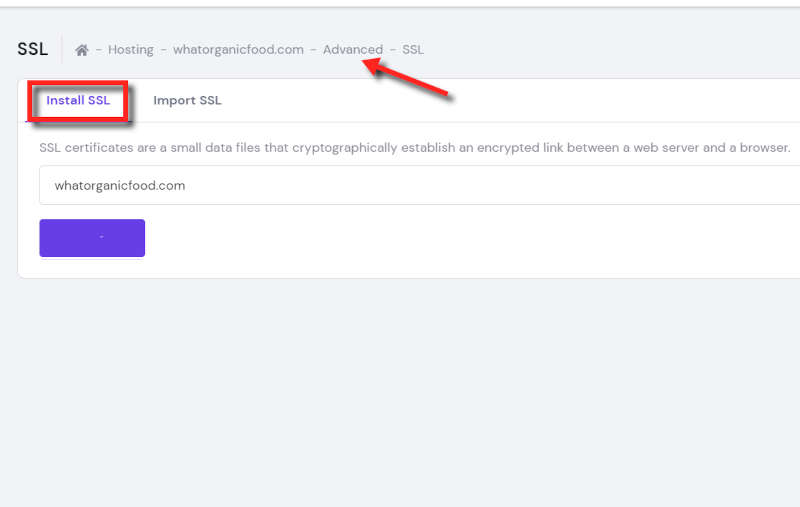
Add SSL Certificate
Before installing WordPress, you must add the SSL certificate that you can find in the “Advanced” section. It’s a free tool. The SSL is important for your blog’s SEO and secure communication, so we recommend activating it immediately. A confirmation box will pop up upon successful completion.
You should be seeing menus in the top and left bar in the user home area.
Install WordPress with Auto Installer
Click ‘Hosting’ from the top bar; your domain will start appearing in the middle of the page. Press the Manage button on the extreme right to enter the dashboard.
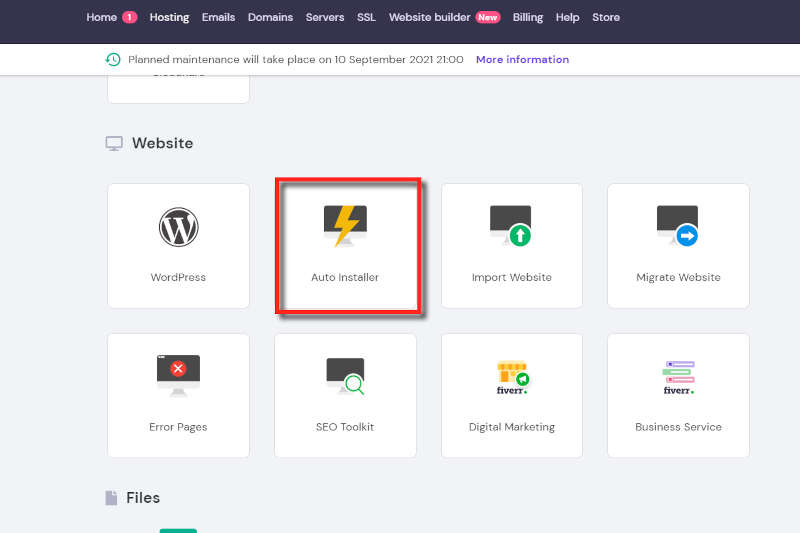
Scroll down and reach the ‘website’ tab that should be showing the “Auto Installer” icon. Click on it, and it will take you to the quick app installation page. Choose “WordPress” on the extreme left.
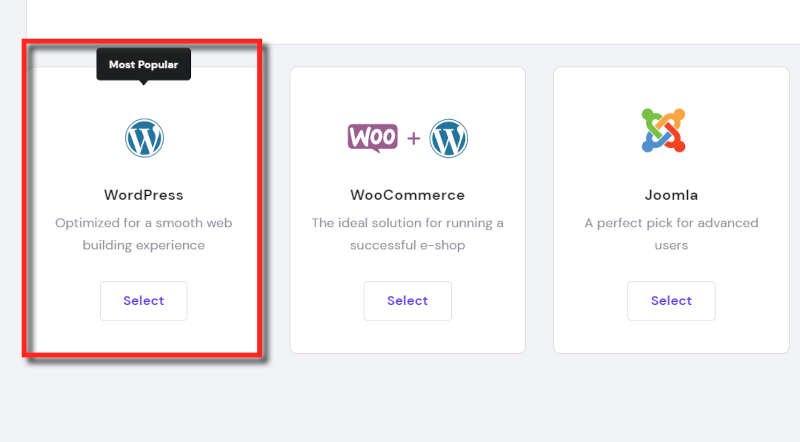
Enter your website credentials on the next screen, such as username, email ID, password, etc.
Your blog will be ready and up in a few seconds.
Login to WordPress Admin Area
Once done, you can open your website home page by typing the blog’s URL in the browser. Of course, there is nothing over there except for WordPress’s sample post.
Type yourdomain.com/wp-admin OR yourdomain.com/wp-login.php to enter your WordPress admin area.
Step# 4 How to create a blog post in WordPress?
For now, we will only focus on creating your first post on the newly installed WordPress blog.
On the WordPress admin area, take a look at the left side menu, roll over your mouse on “Posts”, a sub-menu will appear with the link “add post”. Click on it, and you will see WordPress editor in front of you.
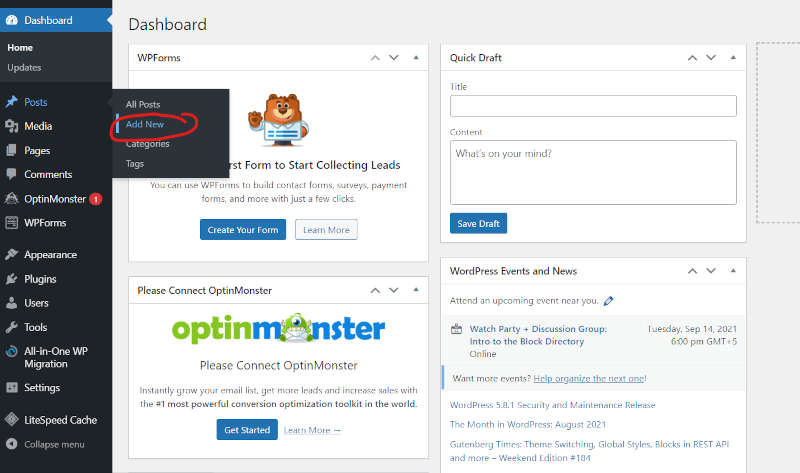
Click on it, and you will see WordPress editor in front of you.
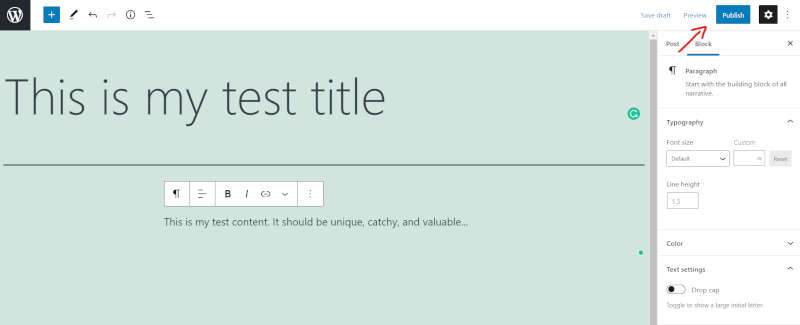
Write anything and put the title of your article. You can add images to your article where ever you want.
At this time, no need to worry about publishing anything silly.
You can always delete it before working on actual content for the people.
Do some experiments and make yourself comfortable with the WordPress dashboard.
As for this tutorial, the purpose is to give you a slight acquaintance of how easily you can publish your first post. Press the publish button on the top right corner. The post should now be on display on your home page.
The default theme will display everything in a center-aligned format. No worries, you can change the complete look of your WordPress blog in a few minutes.
WordPress has a massive repository of hundreds of free themes accessible through the left-hand menu.
Appearance >> Themes
So here is how you can start a blog on WordPress in minutes.
If you find this article helpful, please do let us know in the comment area. We would appreciate it if you could share it with your friends on social platforms.
Happy blogging 🙂